

Key takeaways
- Tool fit and finish: Handles should close comfortably, cutters should meet cleanly, and plier jaws should align. Poor alignment makes small tasks frustrating and can deform wire.
- Useful findings: Count the components needed to finish the advertised projects, not just the bead varieties. Findings are often the first supplies a beginner runs out of.
- Material variety: A mix of shapes and colors is useful for experimentation, but a coordinated palette can make it easier to produce wearable sets. Check whether beads are glass, plastic, stone, or metal rather than relying on color names alone.
- Organization: A divided case prevents tiny jump rings and beads from mixing. Compartments should close securely; a loose-lidded tray can spill when moved.
- Project range: Instructions should match the included tools and materials. A kit that claims to support many projects may still require extra cord, clasps, or specialized tools.
The best jewelry making kits, by project type
The best jewelry making kit for a beginner is a small, organized set with smooth-jaw pliers, usable findings, and enough beads or wire to finish several simple projects—not the kit with the most pieces. For regular use, prioritize tool quality and refillable materials; for a specific craft such as bead weaving or metal stamping, choose a focused kit built for that technique.
There isn’t one universal winner: a bead-heavy starter set suits first-time makers, while a wire-wrapping kit or a bead-loom kit is a better match for someone who already knows what they want to make. The table below compares common kit types by practical features. Exact contents vary by seller, so check the current package list before buying.
Our top picks

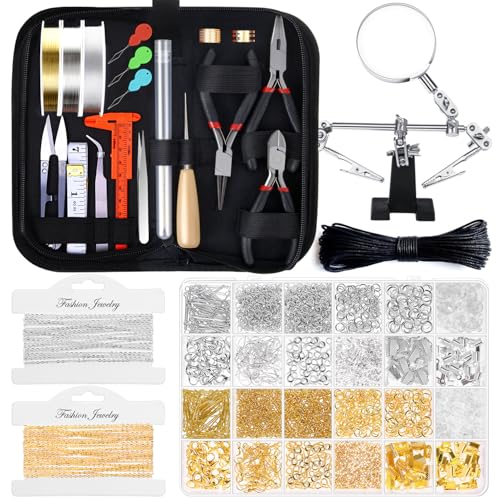


As an Amazon Associate we earn from qualifying purchases at no extra cost to you.
| Kit type | Typical tool count | Common material range | Projects it supports | Best fit |
|---|---|---|---|---|
| General beginner bead kit | 2–4 basic pliers or cutters | About 5–10 bead styles; usually elastic cord, thread, or wire | Stretch bracelets, simple necklaces, earrings | New makers exploring several techniques |
| Wire-wrapping kit | 3–5 pliers/cutters | Typically 2–4 wire gauges, plus beads or stones | Wrapped pendants, loops, linked components | Crafters who want more control over construction |
| Bead-loom kit | 1 loom, often 1–2 finishing tools | Seed beads, thread, needle; bead size varies | Woven bracelets and narrow bands | People interested in repeating patterns and precise beadwork |
| Metal-stamping kit | 1 hammer and a set of steel stamps | Usually 1–3 metal blanks and a stamping surface | Imprinted tags, charms, and personalized components | Experienced or highly motivated beginners with a stable work surface |
Choose by the jewelry you want to make
For a first weekend project: a general bead kit
A beginner set is the easiest way to find out whether you enjoy jewelry making before investing in specialized equipment. Look for round-nose pliers for loops, flat- or chain-nose pliers for gripping, and flush cutters for trimming wire. Two pliers are more useful than a large assortment of tools that do the same job.
Check that the kit includes the findings needed to finish the projects, such as clasps, jump rings, earring hooks, and crimp beads if it uses beading wire. A large assortment of beads can look generous but still leave you short of basic findings. Instructions with clear diagrams matter, too: “make a loop” is less useful to a new maker than a picture showing where to hold and turn the wire.
These kits are best for elastic bracelets, simple strung necklaces, and basic earrings. They are less suited to durable, fine-finish pieces if the cutters are blunt or the pliers have ridged jaws that mark soft metal.
For custom pendants and links: a wire-wrapping kit
Wire work rewards better-fitting tools. Smooth jaws help avoid scratches, and cutters designed for jewelry wire leave a cleaner end than general-purpose household cutters. A kit should state what wire gauges it contains; thicker wire is harder to shape, while very fine wire can kink or break if repeatedly bent.
Choose this type if you want to form your own loops, connect components, or wrap stones. It offers more construction freedom than a preselected bead set, but usually has a steeper learning curve. If the kit includes only one wire gauge, it may limit the range of designs even if the bead assortment is broad.
For patterned bands: a bead loom kit
A loom is a focused purchase rather than an all-purpose starter kit. It holds parallel threads under tension, making it easier to weave consistent rows of small beads. Compare the loom’s usable width and the instructions’ pattern complexity with the bracelet sizes you want to make. Also check whether needles and thread are included: these are essential supplies, not optional extras.
Bead looms suit patient makers who like repetition and color planning. They are not the right choice if your main goal is quick, one-off necklaces or earrings.
For personalized metal pieces: a stamping kit
Stamping kits can make a small set of blanks look distinctive, but they require accurate positioning and controlled hammer strikes. Look for clearly identified stamp characters, a stable bench block or stamping surface, and blanks compatible with the stamps. A kit without spare blanks leaves little room to practice alignment.
This is the least forgiving option for a complete beginner. Start with inexpensive practice blanks and test the spacing before stamping a finished piece; correcting a misplaced letter is usually not possible.
What matters more than the piece count
- Tool fit and finish: Handles should close comfortably, cutters should meet cleanly, and plier jaws should align. Poor alignment makes small tasks frustrating and can deform wire.
- Useful findings: Count the components needed to finish the advertised projects, not just the bead varieties. Findings are often the first supplies a beginner runs out of.
- Material variety: A mix of shapes and colors is useful for experimentation, but a coordinated palette can make it easier to produce wearable sets. Check whether beads are glass, plastic, stone, or metal rather than relying on color names alone.
- Organization: A divided case prevents tiny jump rings and beads from mixing. Compartments should close securely; a loose-lidded tray can spill when moved.
- Project range: Instructions should match the included tools and materials. A kit that claims to support many projects may still require extra cord, clasps, or specialized tools.
Match the kit to your budget, space, and experience
| Your situation | Better choice | Why |
|---|---|---|
| First project, tight budget | Compact bead kit with 2–3 sound tools | Limits upfront cost while covering basic stringing and simple assembly |
| Small desk or shared space | Kit in a locking compartment case | Keeps small parts contained and makes cleanup faster |
| Several hours of crafting each week | Focused kit with replaceable consumables | Better tools and refillable wire, thread, or findings are more useful than a one-time assortment |
| Already comfortable with basic pliers | Wire-wrapping or loom kit | Specialized equipment expands technique instead of duplicating beginner supplies |
| Making gifts or occasional pieces | Coordinated beginner set with project instructions | Ready-to-match materials reduce planning and leftover oddments |
For a rough value check, divide the kit’s price by the number of projects you can complete using only its included materials. For example, a hypothetical $30 kit that contains enough materials for six finished bracelets costs about $5 in kit price per bracelet; if you must buy cord and clasps separately, add those costs before comparing. This is not a measure of tool quality, but it helps expose kits whose large bead counts translate into few complete projects.
Ownership: what wears out and how to avoid waste
Consumables usually run out before tools: elastic cord, beading thread, crimp beads, and jump rings are common refill purchases. In cheaper sets, cutters may lose their clean edge first, while plier jaws can loosen or become misaligned. Avoid cutting steel wire with cutters intended for soft craft wire, and don’t use serrated pliers on finished surfaces unless you want grip marks.
Store tools dry, wipe them after use, and keep beads separated by type and size. When trimming wire, leave a short tail and turn cut ends toward the inside of a design so they are less likely to snag fabric. For elastic bracelets, avoid stretching the cord sharply while tying; excessive tension can weaken it before the piece is worn. Replace damaged findings rather than relying on a bent clasp or an opened jump ring to hold a finished item.
Bottom line
For most newcomers, choose a compact bead kit with two or three well-made basic tools, complete findings, clear instructions, and a secure organizer. Pick wire wrapping if shaping and linking components is the goal, a loom for patterned woven bands, or stamping for personalized metal charms. The best jewelry making kits make the first projects achievable while giving you a clear path to refill the materials you’ll actually use.





Write Your Review
No reviews yet. Be the first to share your experience!